An agent needs a tool interface to act on information outside its conversation. Haystack can expose a selected Model Context Protocol (MCP) server tool through MCPTool, execute the model's request, and return the server's value to the model for its reply.
A local stdio connection starts the MCP server as a subprocess of the Python application, so the server runs with that application's permissions. Connect only a server you trust, because its tool descriptions and returned text also reach the model and can influence what the agent does next.
The starting point is a Haystack environment with ollama-haystack installed and Ollama running, which gives the agent a tool-calling model without an API key. A small math_server.py stands in for an existing MCP server, and its add tool returns a sum that is easy to check by hand. Connecting another stdio server changes its start command, tool name and prompt, while another tool-calling generator replaces only the generator lines.
Steps to use MCP tools in Haystack:
- Install the MCP integration in your Haystack environment.
Haystack 2.23.0 or later stays at its installed version. An older Haystack is upgraded to the latest 3.x release, which can break a 2.x project.
Related: How to migrate from Haystack 2 to 3$ python -m pip install "mcp-haystack==2.1.1"
Tested with mcp-haystack 2.1.1 on Python 3.12, with haystack-ai 3.4.1 and 2.30.2. The package requires Python 3.11 or later.
Related: How to create a virtualenv for Haystack - Download the qwen2.5:0.5b model to Ollama.
$ ollama pull qwen2.5:0.5bThis small model supports tool calls, and ollama show lists tools under Capabilities for any model that does. When using another generator, skip this step.
Related: How to install Ollama on Linux
Related: How to install Ollama on macOS
Related: How to install Ollama on Windows
Related: How to start the Ollama server
Related: How to configure an Ollama chat generator in Haystack - Create a file named math_server.py in your project directory using your text editor.
- math_server.py
from mcp.server import MCPServer

server = MCPServer("math")


@server.tool()
def add(a: int, b: int) -> int:
    """Return the sum of two integers."""
    return a + b


server.run()
The MCPServer class needs mcp 2.x, which mcp-haystack installs unless an older mcp is already present. server.run() serves the tool over stdio by default. Tested with mcp 2.3.0. When connecting your own server, skip this file and its save step.
- Save math_server.py.
- Create a file named mcp_agent.py beside math_server.py using your text editor.
- mcp_agent.py
from haystack.components.agents import Agent
from haystack.dataclasses import ChatMessage
from haystack_integrations.components.generators.ollama import (
    OllamaChatGenerator,
)
from haystack_integrations.tools.mcp import (
    MCPTool,
    StdioServerInfo,
)

chat_generator = OllamaChatGenerator(model="qwen2.5:0.5b")
server_info = StdioServerInfo(
    command="python",
    args=["math_server.py"],
)
command and args form the command line that starts the server, so python must be the active Haystack environment. For your own stdio server, use the start command from its documentation, such as command=“uvx” with args=[“mcp-server-time”]. For another tool-calling generator, replace the Ollama import and the chat_generator line.
Related: How to configure an OpenAI-compatible chat generator in Haystack - Add the following lines at the end of mcp_agent.py to give an agent the add tool.
tool = MCPTool(
    name="add",
    server_info=server_info,
    eager_connect=True,
)
agent = Agent(chat_generator=chat_generator, tools=[tool])
eager_connect=True connects while the tool is created, so the model receives the server's tool description and a wrong tool name fails immediately. The default connects later and sends an empty description. For your own server, set name to its tool name.
Related: How to create a tool-calling agent in HaystackOnly add is offered to the model, and the server process keeps its operating-system permissions. To offer several tools from one server, MCPToolset takes a tool_names list, and leaving it out offers every tool.
- Add the following lines at the end of mcp_agent.py to run the agent.
try:
    result = agent.run(messages=[ChatMessage.from_user(
        "Use the add tool to calculate 13 plus 29."
    )])
    for message in result["messages"]:
        for call in message.tool_calls:
            print("Call:", call.tool_name, call.arguments)
        for response in message.tool_call_results:
            print("Result:", response.result)
    print("Reply:", result["last_message"].text)
finally:
    tool.close()
The agent sends the tool schema to the model, runs the requested call, and returns the result to the model until it replies with text. tool.close() stops the server process even if the run raises an exception. For your own server, change the prompt to a job its tool performs.
- Save mcp_agent.py.
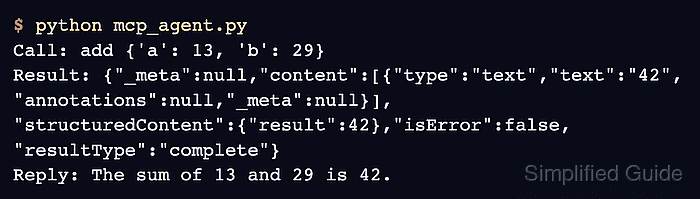
- Run mcp_agent.py from the directory that contains both files. Example output:
$ python mcp_agent.py
Call: add
{'a': 13, 'b': 29}
Result: {"_meta":null,
"content":[{"type":"text",
"text":"42",
"annotations":null,
"_meta":null}],
"structuredContent":
{"result":42},
"isError":false,
"resultType":"complete"}
Reply: The sum of 13
and 29 is 42.
Each label prints on one line and is wrapped here to fit, and the Result value is the MCP result envelope as JSON. The Call argument order and Reply wording vary by run.
- Confirm that the agent called add with 13 and 29 and that its reply uses the returned 42.
Call shows what the model requested, Result shows the server's value with isError set to false, and Reply reports that value. A reply with no Call line came from the model alone, even when the number is right, and a Reply that differs from Result means the model misreported the value. Your own server shows the same three lines with its own tool and values.