How to enable SSO in Open WebUI
Central identity works best when Open WebUI receives the same email, role, and group claims that administrators already use in the identity provider. Enabling SSO with OIDC lets users authenticate with that provider and return to Open WebUI without keeping a separate local password for each person.
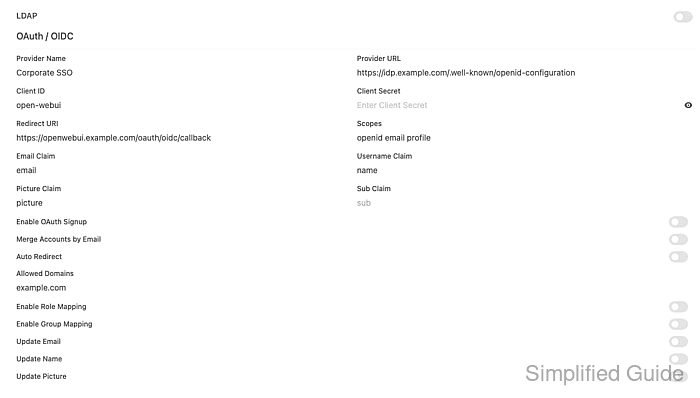
Open WebUI exposes OAuth / OIDC controls under Admin Panel → Settings → Authentication, and the same fields can be supplied as environment variables for container-based deployments. OAuth settings remain environment-authoritative by default unless ENABLE_OAUTH_PERSISTENT_CONFIG is enabled, so the running container configuration should match what the admin panel shows.
Keep a working administrator login until a non-admin SSO user has completed a full sign-in and the resulting role or group membership is checked. The OIDC client must use the exact callback path /oauth/oidc/callback on the public Open WebUI URL and include the openid and email scopes so Open WebUI can create or match the account.
Steps to enable Open WebUI SSO with OIDC:
- Choose the public Open WebUI URL and OIDC provider details.
Open WebUI URL: https://openwebui.example.com
OIDC redirect URI: https://openwebui.example.com/oauth/oidc/callback
OIDC discovery URL: https://idp.example.com/.well-known/openid-configuration
Provider label: Corporate SSO
Scopes: openid email profile
Allowed email domain: example.com
WEBUI_URL must match the browser-facing origin that the identity provider redirects back to. A localhost, private port, or old reverse-proxy URL can make the callback fail after the provider login succeeds.
- Register a confidential web application in the identity provider.
Application type: Web application
Client authentication: Client secret
Redirect URI: https://openwebui.example.com/oauth/oidc/callback
Allowed scopes: openid email profile
Optional role claim: roles
Optional group claim: groups
Register the callback as an exact URI, not as a wildcard or homepage.
Tool: OAuth Redirect URI Policy Checker - Add the core OIDC variables to the env file used by the Open WebUI service.
- open-webui.env
WEBUI_URL=https://openwebui.example.com
ENABLE_OAUTH_SIGNUP=true
OAUTH_PROVIDER_NAME=Corporate SSO
OAUTH_CLIENT_ID=open-webui
OAUTH_CLIENT_SECRET=<client-secret>
OPENID_PROVIDER_URL=https://idp.example.com/.well-known/openid-configuration
OPENID_REDIRECT_URI=https://openwebui.example.com/oauth/oidc/callback
OAUTH_SCOPES=openid email profile
OAUTH_ALLOWED_DOMAINS=example.com
OPENID_PROVIDER_URL is required for generic OIDC. Current Open WebUI releases support one generic OIDC provider through this variable at a time.
- Add role and group mapping only when the identity provider sends those claims.
- open-webui.env
ENABLE_OAUTH_ROLE_MANAGEMENT=true
OAUTH_ROLES_CLAIM=roles
OAUTH_ALLOWED_ROLES=openwebui-user,openwebui-admin
OAUTH_ADMIN_ROLES=openwebui-admin
ENABLE_OAUTH_GROUP_MANAGEMENT=true
OAUTH_GROUP_CLAIM=groups
Role and group mapping should match real claims from the identity provider. If ENABLE_OAUTH_GROUP_MANAGEMENT is enabled, Open WebUI can synchronize group membership from the claim on login, so stale or overbroad IdP group claims can change access inside Open WebUI.
- Recreate the Open WebUI container so the OAuth environment is loaded.
$ docker compose up -d open-webui
[+] Running 1/1
 ✔ Container open-webui-open-webui-1 Started
Use the service manager that controls your deployment when Open WebUI is not running under Docker Compose. For multi-replica deployments, keep WEBUI_SECRET_KEY and OAuth encryption keys consistent across replicas.
Related: How to set WEBUI_SECRET_KEY in Open WebUI - Check the public configuration endpoint for the OIDC provider.
$ curl --silent --show-error https://openwebui.example.com/api/config
{
  "status": true,
  "name": "Open WebUI",
  "oauth": {
    "providers": {
      "oidc": "Corporate SSO"
    },
    "auto_redirect": false
  },
  "features": {
    "auth": true,
    "enable_signup": true
  }
}
providers.oidc should show the label from OAUTH_PROVIDER_NAME. If the provider list is empty, check OPENID_PROVIDER_URL, OAUTH_CLIENT_ID, OAUTH_CLIENT_SECRET, and whether OAuth settings are being read from the environment or persisted config.
- Open Admin Panel → Settings → Authentication and confirm the OAuth / OIDC fields match the provider.
The admin panel is the easiest place to compare Provider Name, Provider URL, Redirect URI, Scopes, Allowed Domains, and mapping toggles after the service restarts.
- Sign in from a private browser session through Corporate SSO.
Login page button: Continue with Corporate SSO
Provider login result: returned to /oauth/oidc/callback
Signed-in account: morgan.identity@example.com
Use a user assigned to the identity-provider application. A callback error usually points to a redirect URI mismatch, missing OPENID_PROVIDER_URL, an untrusted WEBUI_URL value, or a client secret that does not match the provider app.
- Check the created Open WebUI account and access state.
Email: morgan.identity@example.com
Name: Morgan Identity
Role: user
Groups: Support Reviewers
The role and groups should match Default User Role, OAUTH_* role mapping, OAuth group mapping, or existing Open WebUI group assignments. Use SCIM when user and group lifecycle should be provisioned before login.
Related: How to enable SCIM provisioning in Open WebUI
Related: How to create an RBAC group in Open WebUI