Jenkins can turn a saved JMeter plan into a repeatable CI smoke test when each build starts the non-GUI runner and saves the result files. Running the plan from a Pipeline job keeps load-test evidence with the build that produced it instead of leaving .jtl files on an agent workspace.
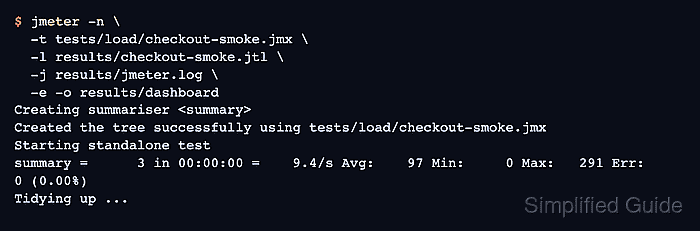
The Pipeline path assumes the Jenkins agent already has Java and jmeter in its PATH, and the repository contains a non-GUI .jmx plan under tests/load. The job runs the same jmeter -n -t -l -j -e -o command an operator would run from a shell, so local CLI debugging remains the fastest way to fix test-plan errors before the build gate runs.
The Pipeline gate uses the standard JMeter CSV result file and fails the build when any saved sample has the success field set to false. It archives the raw .jtl file, jmeter.log, and HTML dashboard on every run, so a failed build still leaves enough evidence to review response codes and assertions.
Steps to run JMeter from Jenkins Pipeline:
- Prepare a Jenkins agent that can run Java and JMeter from the build workspace.
Agent requirement: java and jmeter on PATH
Repository test plan: tests/load/checkout-smoke.jmx
Build output directory: results/
Use an agent label when only selected nodes have JMeter installed.
Related: How to check the Java runtime for JMeter
Related: How to install JMeter on Ubuntu - Commit a non-GUI test plan to the repository.
tests/load/checkout-smoke.jmx
Run the plan from a shell before adding the Pipeline gate, and remove visual listeners that do not belong in CI.
Related: How to disable heavy JMeter listeners before a load test - Create Jenkinsfile in the repository root.
pipeline {
  agent any

  stages {
    stage('Run JMeter smoke test') {
      steps {
        sh '''
          rm -rf results
          mkdir -p results/dashboard
          jmeter -n \
            -t tests/load/checkout-smoke.jmx \
            -l results/checkout-smoke.jtl \
            -j results/jmeter.log \
            -e \
            -o results/dashboard
        '''
      }
    }

    stage('Check JMeter results') {
      steps {
        script {
          def resultRows = readFile('results/checkout-smoke.jtl')
            .readLines()
            .drop(1)
          def failedRows = resultRows.findAll { line ->
            def fields = line.split(',', -1)
            fields.size() > 7 && fields[7] == 'false'
          }
          if (failedRows) {
            error "JMeter reported ${failedRows.size()} failed sample(s)"
          }
          echo "JMeter samples passed: ${resultRows.size()}"
        }
      }
    }
  }

  post {
    always {
      archiveArtifacts artifacts: 'results/**', allowEmptyArchive: false
    }
  }
}
rm -rf results removes only the previous result directory in the Jenkins workspace so JMeter can create a fresh dashboard directory.
Related: How to generate an HTML dashboard report in JMeter - Configure the Jenkins job to read the repository Jenkinsfile.
Job type: Pipeline
Definition: Pipeline script from SCM
Script path: Jenkinsfile
- Start a build of the Pipeline job.
- Open the Console Output page and confirm that JMeter ran in non-GUI mode.
+ jmeter -n -t tests/load/checkout-smoke.jmx -l results/checkout-smoke.jtl -j results/jmeter.log -e -o results/dashboard
Creating summariser <summary>
Created the tree successfully using tests/load/checkout-smoke.jmx
Starting standalone test
summary =      3 in 00:00:00 =    9.4/s Avg:    97 Min:     0 Max:   291 Err:     0 (0.00%)
Tidying up ...
... end of run
A zero process status proves the JMeter engine completed. The next stage still checks the saved sample rows because sampler failures can exist in a completed run.
- Confirm that the result-check stage passed and the archive step ran.
[Pipeline] echo
JMeter samples passed: 3
[Pipeline] archiveArtifacts
Archiving artifacts
Finished: SUCCESS
If any saved row has success set to false, the error step marks the build failed before the final build result is reported.
- Download the archived results directory and list the saved files.
$ ls results
checkout-smoke.jtl
dashboard
jmeter.log
The archive should contain the raw result file, jmeter.log, and results/dashboard/index.html so the run can be reviewed after the agent workspace is reused.
- Inspect the downloaded .jtl file for failed samples.
$ cat results/checkout-smoke.jtl
timeStamp,elapsed,label,responseCode,responseMessage,threadName,dataType,success,failureMessage,bytes,sentBytes,grpThreads,allThreads,URL,Latency,IdleTime,Connect
1782782043995,291,checkout-smoke,200,OK,Thread Group 1-1,text,true,,27,0,1,1,null,0,0,0
1782782044288,0,checkout-smoke,200,OK,Thread Group 1-1,text,true,,27,0,1,1,null,0,0,0
1782782044288,1,checkout-smoke,200,OK,Thread Group 1-1,text,true,,27,0,1,1,null,0,0,0
The success column should show true for every accepted smoke sample.
- Check the generated dashboard statistics.
$ cat results/dashboard/statistics.json
{
  "Total" : {
    "transaction" : "Total",
    "sampleCount" : 3,
    "errorCount" : 0,
    "errorPct" : 0.0,
##### snipped #####
  }
}

Mohd Shakir Zakaria is a cloud architect with deep roots in software development and open-source advocacy. Certified in AWS, Red Hat, VMware, ITIL, and Linux, he specializes in designing and managing robust cloud and on-premises infrastructures.


