Sharing a folder over the network enables controlled file access for other devices and users without duplicating data. Command-line sharing in Windows keeps the setup consistent across multiple systems and fits cleanly into repeatable administration tasks.
Windows file sharing exposes folders over the SMB protocol using a share name that maps to a local path. The net share command creates, lists, and removes these share definitions, while actual access is enforced by both share permissions and the folder’s NTFS permissions.
Creating or changing shares requires administrator privileges and can unintentionally expose sensitive files if permissive access is granted. Network profile and firewall rules (such as File and Printer Sharing for SMB) can block remote access even when a share exists, so verification should include a connectivity check.
Steps to share a folder from the command line in Windows 11:
- Open Command Prompt with administrator privileges.
- Create the folder to share.
C:\>mkdir C:\shared
- Use the net share command to share the folder on the network.
C:\>net share mysharedfolder=C:\shared /GRANT:Everyone,READ
mysharedfolder was shared successfully.
Avoid granting Everyone with FULL unless the share is intended for broad access, and remember that NTFS permissions on C:\shared still apply to remote access.
- Verify the folder's shared status.
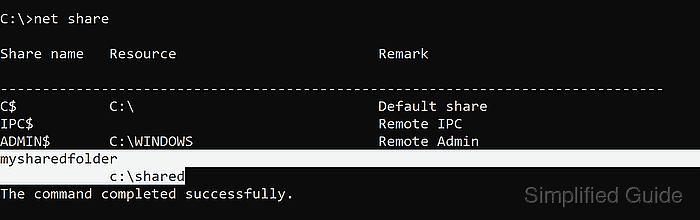
C:\>net share

Share name   Resource                        Remark

-------------------------------------------------------------------------------
C$           C:\                             Default share
IPC$                                         Remote IPC
ADMIN$       C:\Windows                      Remote Admin
mysharedfolder
             C:\shared
The command completed successfully.
The share can be reached using the UNC path \\<computername>\mysharedfolder from other devices.
- Confirm access to the share using a UNC path.
C:\>dir \\localhost\mysharedfolder
 Volume in drive \\localhost\mysharedfolder has no label.
 Volume Serial Number is 3A1B-2C3D

 Directory of \\localhost\mysharedfolder

12/22/2025  09:14 AM    <DIR>          .
12/22/2025  09:14 AM    <DIR>          ..
               0 File(s)              0 bytes
               2 Dir(s)  120,345,567,232 bytes free
Access is denied usually indicates share or NTFS permissions, while The network path was not found often points to firewall or network profile restrictions.
- Remove the share using the net share command.
C:\>net share mysharedfolder /delete
mysharedfolder was deleted successfully.
Removing the share disconnects active sessions to \\<computername>\mysharedfolder.

Mohd Shakir Zakaria is a cloud architect with deep roots in software development and open-source advocacy. Certified in AWS, Red Hat, VMware, ITIL, and Linux, he specializes in designing and managing robust cloud and on-premises infrastructures.


