Recording internet radio on Linux makes it easy to keep favorite shows, DJ mixes, and live broadcasts for offline listening or archiving. Using a dedicated tuner and recorder avoids fragile browser playback and allows unattended captures while other tasks run.
StreamTuner2 operates as a station directory and launcher, pulling channel lists from multiple online radio catalogs and handing the chosen stream URL to an external command. Streamripper is a command-line recorder that connects to that URL, saves the incoming audio stream, and splits tracks when metadata is available. Wiring the two together by configuring the external command to call Streamripper routes any chosen station directly into a recording session under a specific directory.
Capturing network streams consumes bandwidth and disk space and may be restricted by broadcast licenses or station terms of use. The procedure below targets Ubuntu and other Debian-based systems where packages are installed with APT, but the same tools exist on most other Linux distributions under their native package managers. Before scheduling long recordings, confirm sufficient free space under the destination directory and verify that playback codecs are present so recorded files open cleanly in the preferred media player.
Steps to record Internet radio in Linux:
- Open a terminal on the Linux system.
$ whoami
root
- Install StreamTuner2 and Streamripper using the package manager on a Debian or Ubuntu system.
$ sudo apt update && sudo apt install --assume-yes streamripper streamtuner2
Reading package lists...
Building dependency tree...
Reading state information...
5 packages can be upgraded. Run 'apt list --upgradable' to see them.
Reading package lists...
Building dependency tree...
Reading state information...
streamripper is already the newest version (1.64.6-1build3).
streamtuner2 is already the newest version (2.2.2+dfsg-2ubuntu1).
0 upgraded, 0 newly installed, 0 to remove and 5 not upgraded.
This command applies to Ubuntu and other Debian-based distributions; use equivalent packages and options on other Linux systems.
- Create the ~/streamripper directory to hold recordings written by Streamripper.
$ mkdir -p ~/streamripper
- Start StreamTuner2 from the terminal for the first run.
$ streamtuner2
- Click Save to accept the default options if the Configuration Settings window appears on first launch.
Skip this dialog if the defaults were already saved during an earlier run of StreamTuner2.
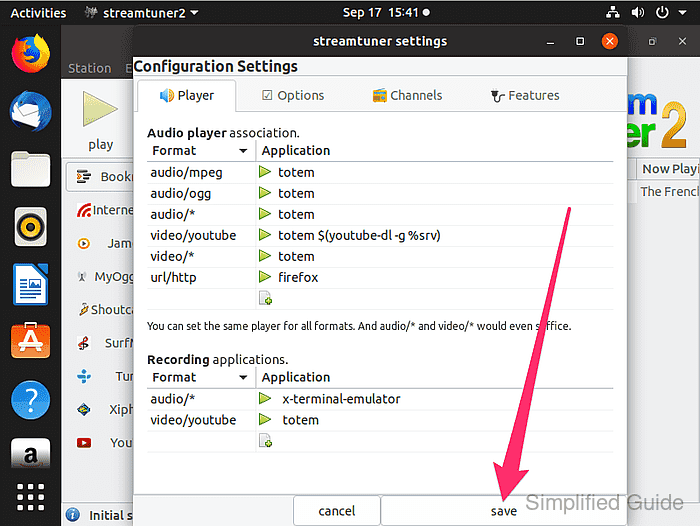
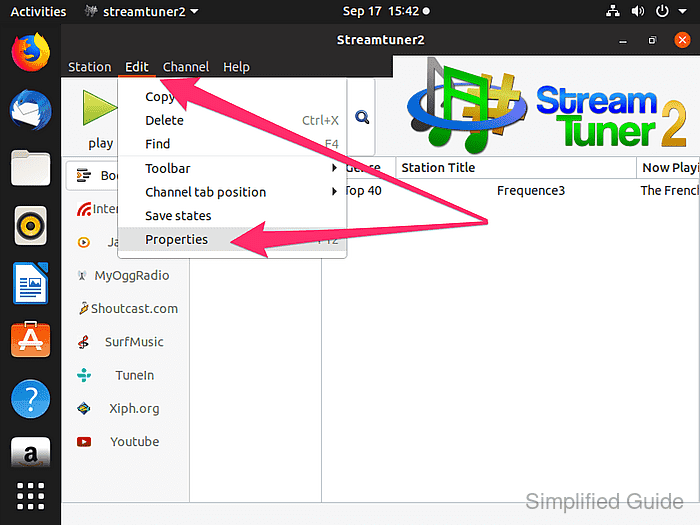
- Open the properties dialog by selecting Edit → Properties from the toolbar menu.
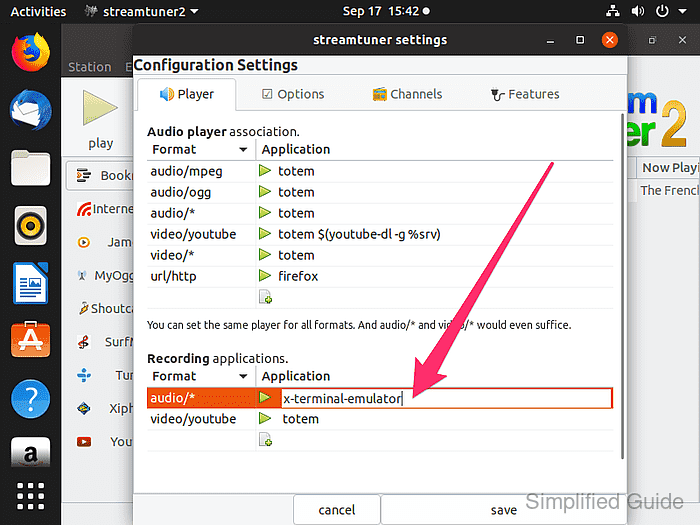
- Double-click the x-terminal-emulator entry in the recording command field to enable editing of the audio recording application.
- Enter the following command and confirm with [ENTER] to configure StreamTuner2 to start Streamripper and save radio streams under ~/streamripper.
x-terminal-emulator -e /usr/bin/streamripper %srv -d ~/streamripper
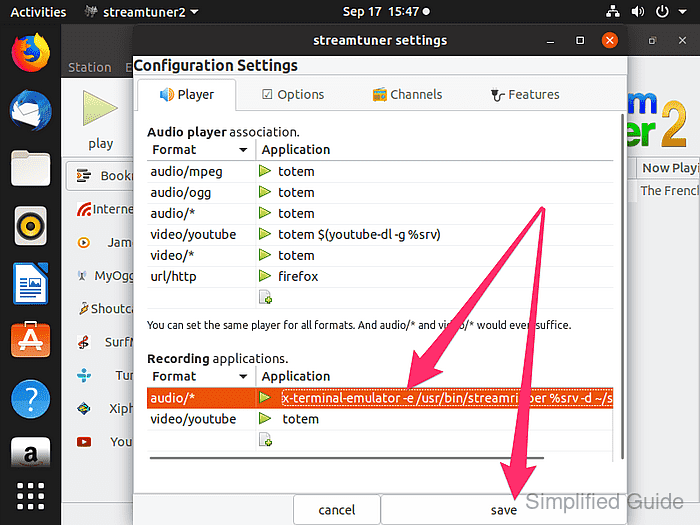
- Click Save to close the properties dialog and store the updated recording command.
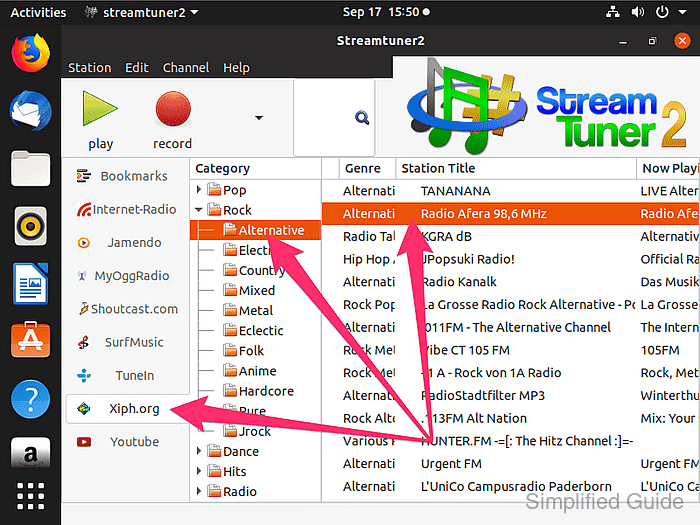
- Select a radio station from the channel list that should be recorded.
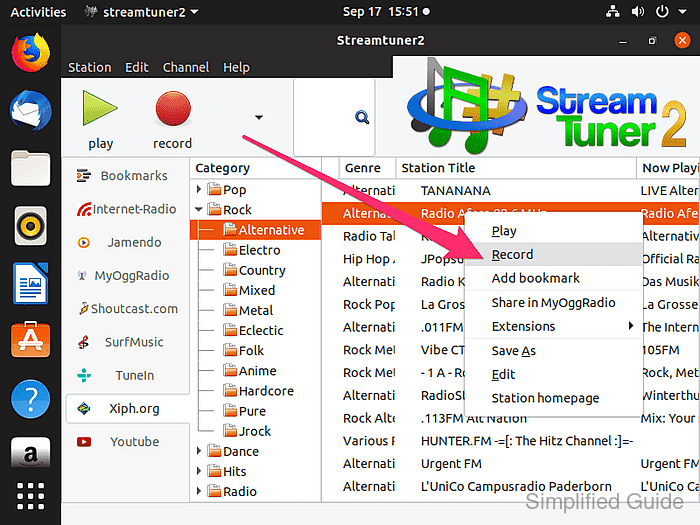
- Right-click the selected station and choose Record to start Streamripper and begin capturing the stream.
Lack of appropriate media codecs prevents recorded files from playing back correctly; install missing codecs before relying on long recordings.
Related: How to install proprietary media codecs and Microsoft fonts on Ubuntu - Change into the directory where Streamripper stores captured streams for the configured user.
$ cd ~/streamripper/Streamripper_rips/incomplete
- List the recorded files to confirm that the station audio was saved successfully.
$ ls
Beth Orton - Thinking About Tomorrow.mp3
Sorten Muld - Bonden Og Elverpigen.mp3


Mohd Shakir Zakaria is a cloud architect with deep roots in software development and open-source advocacy. Certified in AWS, Red Hat, VMware, ITIL, and Linux, he specializes in designing and managing robust cloud and on-premises infrastructures.


