Installing MySQL or MariaDB server on a CentOS Stream, RHEL, or Fedora host gives applications and admins a local SQL service with packaged updates, predictable service management, and standard filesystem locations. That is usually cleaner than unpacking vendor tarballs by hand, especially when the host also needs routine security updates and systemd supervision.
On current Red Hat family releases, dnf pulls the server daemon, client utilities, and the matching systemd unit from the enabled repositories. MariaDB installs the mariadb.service unit and the mariadbd server binary, while distro-packaged MySQL installs the mysqld.service unit and the mysqld server binary with data stored under /var/lib/mysql.
Choose one server family before you install it, because current MariaDB and MySQL RPM sets still conflict with each other on Red Hat family systems. Package names vary by release: RHEL 9 uses unversioned RPMs for the initial streams and modules for newer streams, RHEL 10 uses direct versioned RPMs for newer streams, and Fedora tracks its current distribution defaults with optional versioned packages. Only open TCP port 3306 after the server is running and you have decided whether remote access is actually required.
Steps to install MySQL or MariaDB server on CentOS Stream, RHEL, and Fedora:
- Open a terminal session with an account that can use sudo.
- Refresh repository metadata and install pending system updates before adding the database server packages.
$ sudo dnf upgrade --refresh --assumeyes
Rocky Linux 9 - BaseOS                          6.1 MB/s | 9.1 MB     00:01
Rocky Linux 9 - AppStream                       6.4 MB/s |  12 MB     00:01
Rocky Linux 9 - Extras                           24 kB/s |  17 kB     00:00
Dependencies resolved.
##### snipped #####
Complete!
- Decide whether the host should run MariaDB or MySQL.
Install only one server family at a time. Current distro MariaDB and MySQL packages replace some shared libraries and helper packages, so switching families is cleaner after removing the previously installed database server first.
- Check which server package names the current release exposes before choosing the install command.
$ sudo dnf list --available "mysql*-server" "mariadb*-server"
Available Packages
mariadb-gssapi-server.aarch64              3:10.11.15-2.el10     appstream
mariadb-server.aarch64                     3:10.11.15-2.el10     appstream
mariadb11.8-gssapi-server.aarch64          3:11.8.6-2.el10       appstream
mariadb11.8-server.aarch64                 3:11.8.6-2.el10       appstream
mysql8.4-server.aarch64                    8.4.9-1.el10          appstream
On RHEL 9, also check module streams with
$ sudo dnf module list mariadb mysql
when you need MariaDB 10.11, MariaDB 11.8, or MySQL 8.4 instead of the initial release stream. Current Fedora releases expose unversioned defaults such as mariadb-server and mysql-server plus release-specific versioned alternatives.
- Install the MariaDB server package when MariaDB is the chosen database.
$ sudo dnf install --assumeyes mariadb-server
Last metadata expiration check: 0:00:04 ago on Sun Jun  7 04:51:31 2026.
Dependencies resolved.
================================================================================
 Package                     Arch     Version                  Repository  Size
================================================================================
Installing:
 mariadb-server              aarch64  3:10.11.15-2.el10        appstream  9.5 M
Installing dependencies:
 mariadb                     aarch64  3:10.11.15-2.el10        appstream  1.7 M
 mariadb-common              noarch   3:10.11.15-2.el10        appstream   32 k
##### snipped #####
Complete!
Use
$ sudo dnf module install mariadb:10.11/server
on RHEL 9.4 or later, or
$ sudo dnf module install mariadb:11.8/server
on RHEL 9.8 or later, when you need those module streams. Use
$ sudo dnf install --assumeyes mariadb11.8-server
on RHEL 10.2 or later, or on CentOS Stream 10, when you need the MariaDB 11.8 stream instead of the default MariaDB 10.11 package.
- Install the distro MySQL server package when MySQL is the chosen database.
$ sudo dnf install --assumeyes mysql8.4-server
Last metadata expiration check: 0:00:03 ago on Sun Jun  7 04:53:08 2026.
Dependencies resolved.
================================================================================
 Package                     Arch     Version                  Repository  Size
================================================================================
Installing:
 mysql8.4-server             aarch64  8.4.9-1.el10             appstream   17 M
Installing dependencies:
 mysql8.4                    aarch64  8.4.9-1.el10             appstream  2.2 M
 mysql8.4-common             noarch   8.4.9-1.el10             appstream   73 k
##### snipped #####
Complete!
Use
$ sudo dnf install --assumeyes mysql-server
for the default MySQL 8.0 RPM on RHEL 9, or
$ sudo dnf module install mysql:8.4/server
on RHEL 9.6 or later when you need the MySQL 8.4 stream. Current Fedora releases usually use mysql-server for the default MySQL 8.4 package and may expose older versioned packages such as mysql8.0-server.
- Enable and start the database service.
$ sudo systemctl enable --now mysqld.service
Created symlink '/etc/systemd/system/multi-user.target.wants/mysqld.service' -> '/usr/lib/systemd/system/mysqld.service'.
Use
$ sudo systemctl enable --now mariadb.service
if MariaDB was installed.
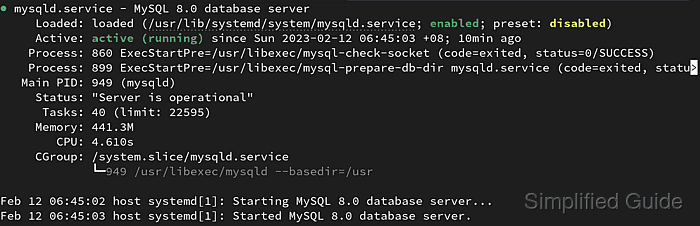
- Verify that the selected database service is running.
$ sudo systemctl status mysqld.service
● mysqld.service - MySQL Server
     Loaded: loaded (/usr/lib/systemd/system/mysqld.service; enabled; preset: disabled)
     Active: active (running) since Sun 2026-06-07 04:53:33 UTC; 14s ago
     Status: "Server is operational"
##### snipped #####
Check mariadb.service with
$ sudo systemctl status mariadb.service
when the host is running MariaDB instead.
- Run the post-install hardening script for the server you installed.
$ sudo mysql_secure_installation

Securing the MySQL server deployment.

Enter password for user root:
For MariaDB, run
$ sudo mariadb-secure-installation
. Current RHEL family MariaDB packages also ship mysql_secure_installation as a compatibility command, but the MariaDB command name is clearer in mixed environments.
Answer the hardening prompts intentionally: remove anonymous users, disallow remote root login, remove the test database, and reload privilege tables. If MariaDB is using socket-authenticated local root access, decide whether to keep that model before setting a password. Related: How to secure MySQL or MariaDB installation
- Connect locally with the client and confirm that the server answers queries.
$ mysql -u root -p --execute "SELECT VERSION();"
Enter password:
VERSION()
8.4.9
On MariaDB, the same test often reports a version string such as 10.11.15-MariaDB, and
$ mariadb -u root -p --execute "SELECT VERSION();"
works too if you prefer the native client command name. Fresh MariaDB installs that keep socket-authenticated local root access may not need -p for local administrative checks.

Mohd Shakir Zakaria is a cloud architect with deep roots in software development and open-source advocacy. Certified in AWS, Red Hat, VMware, ITIL, and Linux, he specializes in designing and managing robust cloud and on-premises infrastructures.


