A Grafana-managed alert rule can evaluate an InfluxDB time-series query and turn a threshold crossing into an alert instance. Creating the rule in the alert editor is useful when metrics already live in InfluxDB and operators need Grafana to notify responders before a dashboard is checked manually.

Grafana evaluates alert queries on the backend, so the InfluxDB query must return numeric time-series data that can be reduced to a single value. For Flux queries, filtered measurements and non-empty aggregate windows keep the reduced value aligned with the threshold check.
Start with a working InfluxDB data source, a contact point or notification policy, and permission to create alert rules in the target folder. Dashboard template variables are not available during backend alert evaluation, so replace dashboard-only variables with literal tag values or query labels before saving the rule.
Steps to create a Grafana alert from an InfluxDB query:
- Open Alerting → Alert rules and click New alert rule.
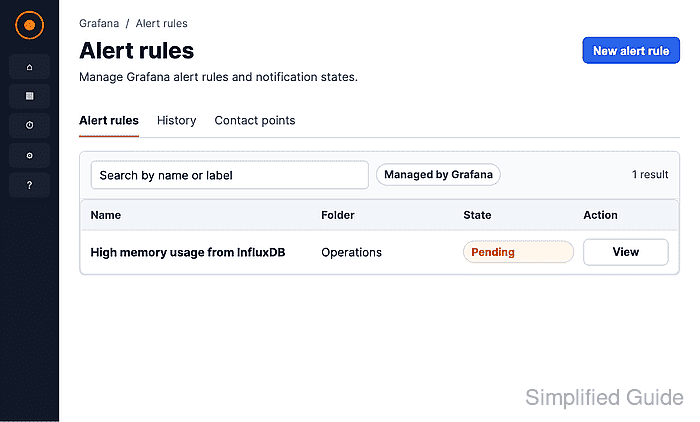
- Enter a rule name that identifies the monitored metric and source.

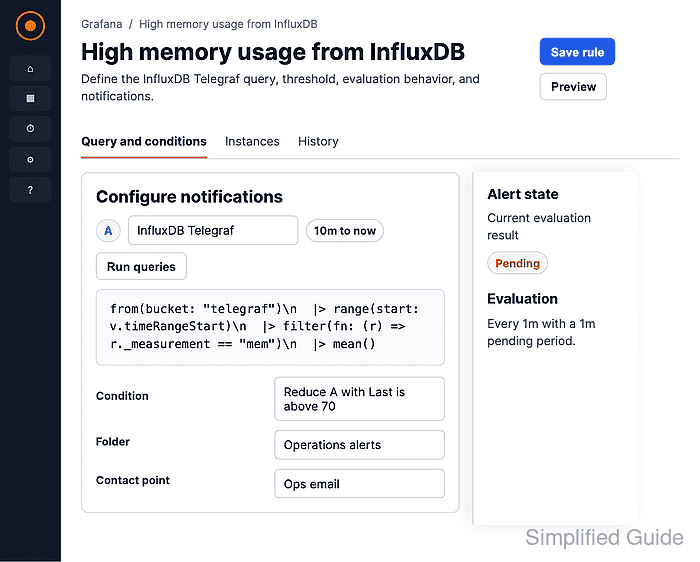
- Select the InfluxDB data source and enter a Flux query that returns the alerting series.
from(bucket: "telegraf")
  |> range(start: v.timeRangeStart, stop: v.timeRangeStop)
  |> filter(fn: (r) => r["_measurement"] == "mem")
  |> filter(fn: (r) => r["_field"] == "used_percent")
  |> aggregateWindow(every: v.windowPeriod, fn: mean, createEmpty: false)
  |> yield(name: "mean")
Use the bucket, measurement, field, and tag filters that match the production metric. createEmpty: false prevents the last reduced value from becoming null when sparse data leaves empty windows.
- Set the alert condition to reduce query A with Last and compare it with the threshold.
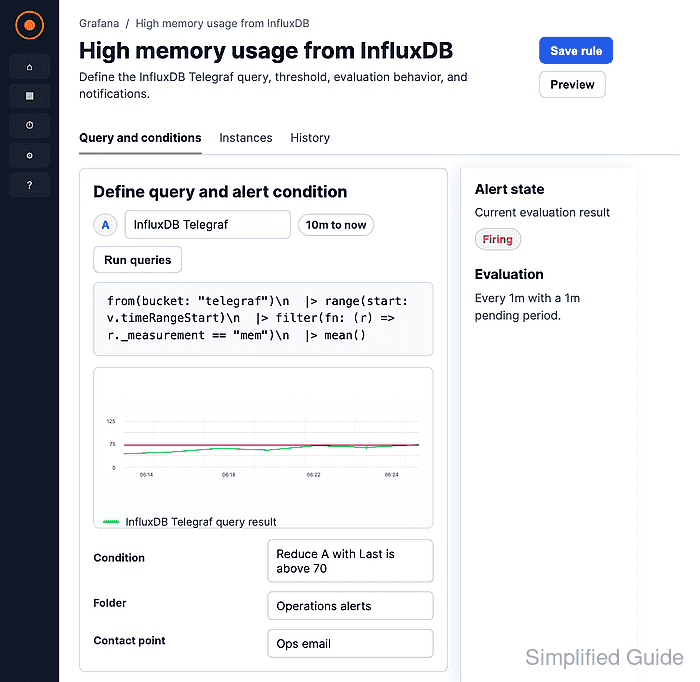
The preview should show a numeric reduced value and Normal, Pending, or Firing. No data usually means the time range is empty, the query returns only nulls, or the rule still contains dashboard variables.
- Click Preview alert rule condition to test the InfluxDB query and threshold before saving.
- Select the folder that should own the rule.

Add labels such as service, team, or severity when notification policies or silences depend on them.
- Select or create an evaluation group and interval.

The evaluation group controls how often Grafana checks the rule. The pending period controls how long the condition must remain true before the alert moves from Pending to Firing.
- Select the contact point that should receive firing notifications.
Use Advanced options when notifications should be routed through notification policies instead of a direct contact point.
- Enter a summary and description for responders.
- Save the alert rule.
- Open the saved rule and confirm the query, reduced value, threshold, notification target, and rule state.
The rule can show Pending until the pending period elapses, even when the condition preview already shows Firing.

Mohd Shakir Zakaria is a cloud architect with deep roots in software development and open-source advocacy. Certified in AWS, Red Hat, VMware, ITIL, and Linux, he specializes in designing and managing robust cloud and on-premises infrastructures.


