Elasticsearch is not included in the default APT repositories for Ubuntu or Debian. However, it can be installed by adding the official Elastic repository to your system. This ensures you can download and manage updates for Elasticsearch through your package manager.
Before installing Elasticsearch, ensure that Java Runtime Environment (JRE) is installed, as it is required for Elasticsearch to run. Both JRE and Elasticsearch can be installed directly from the terminal using APT.
Firewall settings need to be configured to allow Elasticsearch to communicate via the necessary ports. Specifically, ensure that ports 9200 and 9300 are open. After installation, configure Elasticsearch to run automatically during system boot and manage it as a service.
Steps to install Elasticsearch on Ubuntu or Debian:
- Add the GPG key for the Elasticsearch repository.
$ wget --quiet --output-document=- https://artifacts.elastic.co/GPG-KEY-elasticsearch | gpg --dearmor | sudo tee /usr/share/keyrings/elasticsearch-archive-keyring.gpg
[sudo] password for user:
- Add the Elasticsearch repository to APT sources.
$ echo "deb https://artifacts.elastic.co/packages/7.x/apt stable main" | sudo tee -a /etc/apt/sources.list.d/elastic-7.x.list
deb https://artifacts.elastic.co/packages/7.x/apt stable main
[sudo] password for user:
deb https://artifacts.elastic.co/packages/7.x/apt stable main
- Update the list of available packages.
$ sudo apt update
Hit:1 https://artifacts.elastic.co/packages/7.x/apt stable InRelease
Hit:2 http://archive.ubuntu.com/ubuntu hirsute InRelease
Get:3 http://security.ubuntu.com/ubuntu hirsute-security InRelease [101 kB]
Get:4 http://archive.ubuntu.com/ubuntu hirsute-updates InRelease [109 kB]
Hit:5 http://archive.ubuntu.com/ubuntu hirsute-backports InRelease
Fetched 209 kB in 1s (157 kB/s)
Reading package lists... Done
Building dependency tree... Done
Reading state information... Done
All packages are up to date.
- Install Java Runtime Environment (JRE).
$ sudo apt install --assume-yes default-jre
Reading package lists... Done
Building dependency tree... Done
Reading state information... Done
The following additional packages will be installed:
  ca-certificates-java default-jre-headless fonts-dejavu-extra java-common
  libatk-wrapper-java libatk-wrapper-java-jni openjdk-11-jre
  openjdk-11-jre-headless
Suggested packages:
  fonts-ipafont-gothic fonts-ipafont-mincho fonts-wqy-microhei
  | fonts-wqy-zenhei
The following NEW packages will be installed:
  ca-certificates-java default-jre default-jre-headless fonts-dejavu-extra
  java-common libatk-wrapper-java libatk-wrapper-java-jni openjdk-11-jre
  openjdk-11-jre-headless
0 upgraded, 9 newly installed, 0 to remove and 0 not upgraded.
Need to get 39.6 MB of archives.
After this operation, 179 MB of additional disk space will be used.
##### snipped
- Install the Elasticsearch package.
$ sudo apt install --assume-yes elasticsearch
Reading package lists... Done
Building dependency tree... Done
Reading state information... Done
The following NEW packages will be installed:
  elasticsearch
0 upgraded, 1 newly installed, 0 to remove and 0 not upgraded.
Need to get 326 MB of archives.
##### snipped
- Allow access to ports 9200 and 9300 in the firewall.
$ sudo ufw allow 9200
Rules updated
Rules updated (v6)
$ sudo ufw allow 9300
Rules updated
Rules updated (v6)
- Edit the Elasticsearch configuration file if needed.
$ sudo vi /etc/elasticsearch/elasticsearch.yml
To listen on all available IP addresses, modify the network settings in the configuration file:
network.host: 0.0.0.0
- Enable the Elasticsearch service to start on boot.
$ sudo systemctl enable elasticsearch
Synchronizing state of elasticsearch.service with SysV service script with /lib/systemd/systemd-sysv-install.
Executing: /lib/systemd/systemd-sysv-install enable elasticsearch
Created symlink /etc/systemd/system/multi-user.target.wants/elasticsearch.service → /lib/systemd/system/elasticsearch.service.
- Start the Elasticsearch service.
$ sudo systemctl start elasticsearch
- Test the Elasticsearch service.
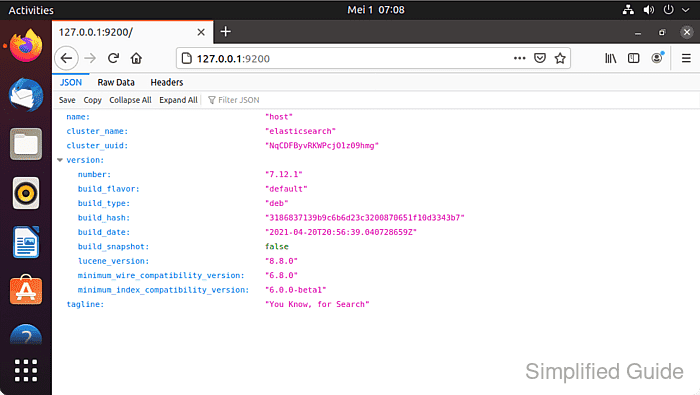
$ curl 127.0.0.1:9200
{
  "name" : "host",
  "cluster_name" : "elasticsearch",
  "cluster_uuid" : "NqCDFByvRKWPcjO1z09hmg",
  "version" : {
    "number" : "7.12.1",
    "build_flavor" : "default",
    "build_type" : "deb",
    "build_hash" : "3186837139b9c6b6d23c3200870651f10d3343b7",
    "build_date" : "2021-04-20T20:56:39.040728659Z",
    "build_snapshot" : false,
    "lucene_version" : "8.8.0",
    "minimum_wire_compatibility_version" : "6.8.0",
    "minimum_index_compatibility_version" : "6.0.0-beta1"
  },
  "tagline" : "You Know, for Search"
}
If you get a connection error right after starting the service, it may be because Elasticsearch takes a few moments to start. Retry after a short wait.
$ curl 127.0.0.1:9200
curl: (7) Failed to connect to 127.0.0.1 port 9200: Connection refused


Mohd Shakir Zakaria is a cloud architect with deep roots in software development and open-source advocacy. Certified in AWS, Red Hat, VMware, ITIL, and Linux, he specializes in designing and managing robust cloud and on-premises infrastructures.


Comment anonymously. Login not required.